SECOND PART OF THE TOE- The second part of the toe is knitted in the same way as the second part of the heel, by lowering the needles into the cylinder, one at each row, alternating left and right sides. When the toe is finished, knit two complete rounds before breaking the yarn, in order to have sufficient yarn with which to sew up the toes. Break the yarn, turn the crank, holding the work with your hand, the sock will come off the cylinder.
SEWING THE TOE- By knitting the toe on the same part of the cylinder as for the heel, that is to the front of the machine C, on line 3-4 the seam will be on the top of the sock; to get the seam on the bottom of the sock, you must knit the toe at the back of the machine A, on the line 1-2.
TO CLOSE THE TOE- After taking the sock off the machine, iron the toe under a damp cloth with a hot iron which will keep the stitches from unraveling and makes the sewing easier.
 To
learn to close the toe well, we advise you to start by practicing on an old
piece of knitting where the stitches are still intact, studying the path the
yarn must take to close the knitting. See
fig. 3.
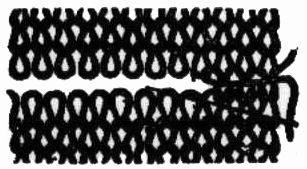
To
learn to close the toe well, we advise you to start by practicing on an old
piece of knitting where the stitches are still intact, studying the path the
yarn must take to close the knitting. See
fig. 3.Hold the work with you left hand, the toe up and ravel the two rounds you knitted as well as the last half round, until the yarn reaches the corner at the right side of the opening. Break the yarn at ¾ yard from the work and thread it into a darning needle, pass two times in each stitch, see fig. 3, the first from out to in and the second from in to out.
Begin to close the toe, on the side at the right corner, threading the stitches as shown in fig.3, hold the stitches with the index finger and the thumb of the left hand. By carefully following this method you will succeed in sewing the end of the toe, closing it up as well as if it had been entirely machine knit.
TENSION OR LENGTH OF STITCHES- The tension or length of the stitches on the needles of the cylinder is regulated by the regulating screw No.7321, which is near the part of the base by which the machine is attached to the table. Turn this screw and the indicator point will go up or down. You will have the longest stitches with the indicator pointing down. This screw allows you to regulate the tension, as you need.
TO REMOVE OR TO CHANGE THE CYLINDER- The cylinder is attached to the base of the machine, underneath, by two screws. First take out all of the needles from the cylinder, remove the spring band No.7171, remove the two screws from the base, as well as the cylinder lever No.7448 in the inside of the cylinder and remove the cylinder.